The Basic Education Information System (BEIS) is the primary MIS of the Department of Education. The BEIS processes data required for budget preparation, resource allocation and performance monitoring. The BEIS is currently composed of the following modules which cater to the different needs of the Department:
School Statistics Module – Used to enter data from the Monthly Report on Enrolment and Attendance of Pupils/Students (Form 3) as well as other school statistics on teaching and non-teaching personnel, classrooms, furniture and toilets. These data are the basis for generating the budget reports and performance indicators of the Department. The system is also capable of monitoring the decrease in enrolment on a monthly basis. This allows education officials to identify schools with pupils/students at risk of dropping out even before the school year ends. Programs and projects can therefore be implemented within the school year to prevent these pupils/students from dropping out.
Physical Facilities Module – Designed to address the needs of the Physical Facilities Coordinator. It can currently record data from the School Building Card, the status of titling school sites and damages caused by calamities.
Achievement Module – Designed to process the results of the National Achievement Test as well as the Regional Achievement Test.
Textbooks Module – Used to encode and process school data on textbooks. It generates reports that facilitates planning and budgeting of textbook needs by grade area and subject level as well as identifying areas with excess books that can be redistributed to schools with shortages.
Health and Nutrition Module – Used to encode and process the nutritional status of pupils and students in public schools.
NCBTS Module – Used to identify the competency strengths and gaps between the expected and the current teacher’s competencies in terms of Knowledge, Skills and Attitudes measured through the Teacher’s Strengths and Needs Assessment (TSNA) of the National Competency-Based Teacher Standards (NCBTS).
Palarong Pambansa Module – Used to publish the official gallery of athletes who are qualified to participate in the Palarong Pambansa. The system was adopted by the National Screening Committee during the Palarong Pambansa 2010 held in Tarlac City from April 11-17, 2010.
School Sports Module – Used to record data for athletes and generate the masterlist of athletes participating in activities such as the National Palaro or the Regional Meets.
Table of Contents
1. INTRODUCTION
1.1. The Basic Education Information System – School Statistics Module
1.1.1. The Basic Education Information System – School Statistics Module (BEIS-SSM) is used to edit school information, open or close schools at the start of the school year, and enter school level data on the following records: monthly report on enrolment (form 3), school head, pupil data, age profile, shifting data, promotees, dropouts, rooms, utilities, furniture, toilets, local teachers, non-teaching personnel, teaching personnel, teacher assignment, SPED data, and ICT facilities.
1.2. The User’s Handbook
1.1.2. The user’s handbook is meant to serve as a step-by-step guide on how to operate the software application for the BEIS-SSM. It illustrates the commands needed to edit school information, open and close schools and enter school level data on enrolment, teachers and facilities.
2. ACCESSING THE BEIS-SSM
2.1. Website
2.1.1. The BEIS-SSM can be accessed at http://beis.depedonline.net/schstat/.
2.1.2. The BEIS-SSM is optimized for the Firefox browser. The system runs significantly faster in Firefox compared to Internet Explorer. Firefox can be downloaded at http://www.firefox.com.
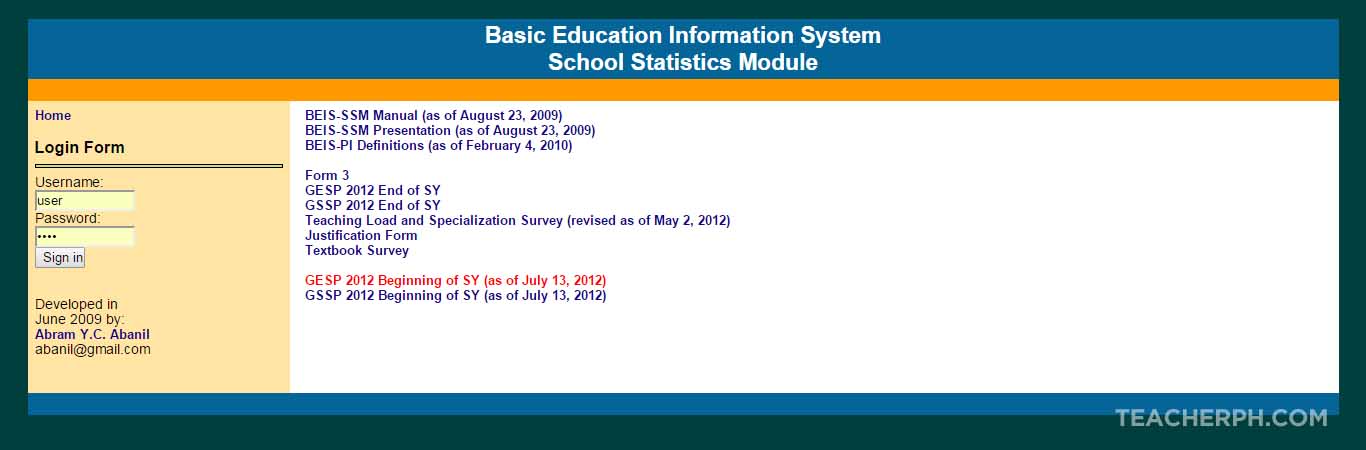
2.2. Login Page
2.2.1. The login page appears when the user accesses the BEIS-SSM website. Enter your username and password to access the functions of the BEIS-SSM Module. New us-ers have to contact the BEIS system administrator, Mr. Abram Y.C. Abanil, at ab-anil@gmail.com, 088-8563932, 0920-9526108, or 0921-9785500 to request for a username and password. If the BEIS website cannot be displayed please contact the administrator immediately so the problem can be resolved.
2.3. Main Page
2.3.1. Entering the correct username and password will bring the user to the BEIS-SSM Main Page. The functions which a user can access through the Main Page will differ depending on the level of authority assigned to the user. There are currently 6 types of user levels: administrator, region, division, school district, elementary school and secondary school.
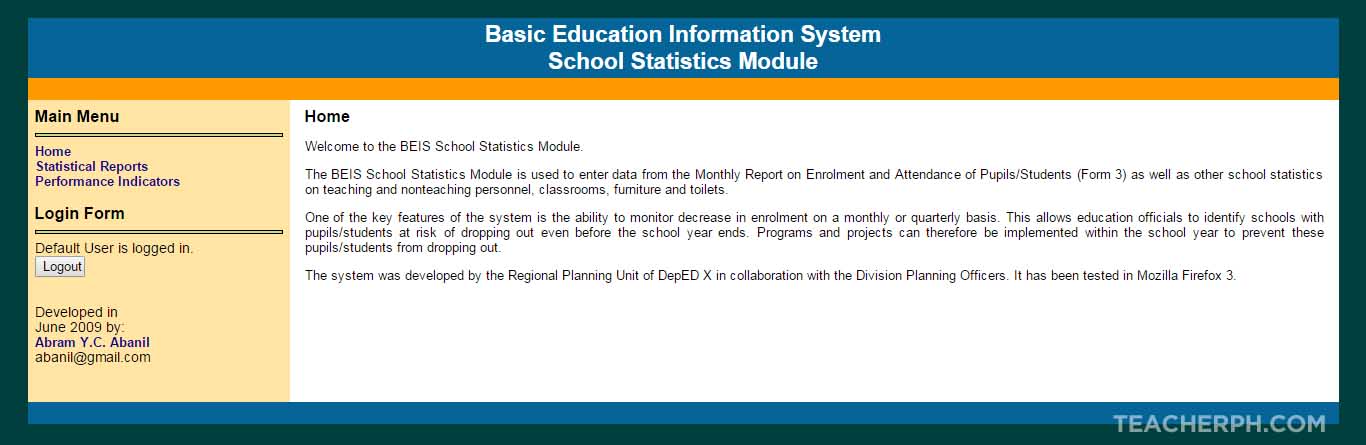
2.3.2. Users with administrator privileges can edit data for all schools in the country. Users with region, division, school district, elementary school and secondary school privileges can edit schools only for their respective areas. However, all types of users can view and generate reports for any school in the country.
3. ENTERING DATA IN THE BEIS-SSM
3.1. Edit Password
3.1.1. The <Edit Password> link will bring the you to the Edit Password Screen where the password can be changed. Simply enter your original password in the <Enter Password> box, then enter your new password in the <New Password> and <Retype Password> box, then click the <Edit> button to save the changes. It is important to change your password from the default password given by the administrator to ensure that unauthorized users will not be able to modify the data in your respective jurisdiction.
3.2. Edit Contact Information
3.2.1. The <Edit Contact Info> link will bring the you to the Edit Contact Information Screen where you can enter your contact information. Simply enter your contact details then click the <Edit> button to save the data. It is important to enter your contact information since future announcements regarding the BEIS will be coursed through the information you have provided in this module.
3.3. Edit School Information
3.3.1. The <Edit School> link allows you to edit basic information on the school. Clicking on the link will bring you to the Select School Screen. Simply fill in the required information to access the school you want to edit and click on the <Next> button.
3.3.2. Clicking on the Next button will bring you to the Edit School Screen. Enter the data required and click on the <Edit> button to save the data. If the school is an annex, select the Annex School option in the <School Type> dropdown. You will also need to enter the Mother School ID of the annex school. The correctness of mother and annex schools can be reviewed through the <List of Mother Schools and Annexes> discussed in Sections 4 and 5. This report should be reviewed after editing the schools.
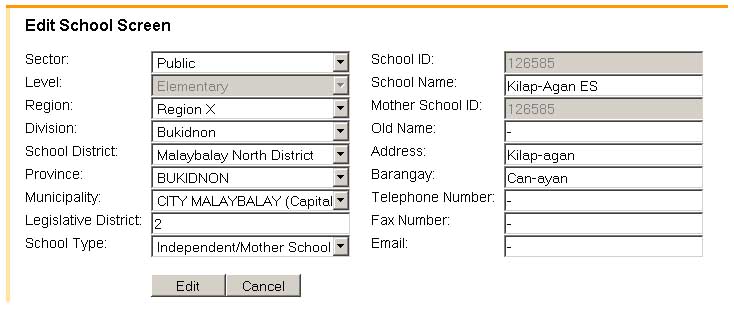
3.3.3. Redistricting of schools can also be done through the Edit School Screen by changing the school district of the school. Moving a school to another division or region can only be done by the administrator or regional office.
3.3.4. To protect the integrity of the School IDs, adding of schools can be done only by the administrator. New schools can be added by sending an email to the administrator. The email should contain all the information found in the Edit School Screen. After the administrator adds the school, the division has to review the details of the new school through the <Edit School> link.
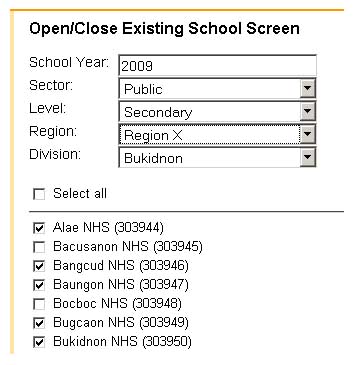
3.4. Opening and Closing of Schools
3.4.1. The <Open/Close School> link allows you to open or close a school for a particular school year. Opening a school is required before school statistics can be encoded for that school. Simply enter the appropriate school year and level. A list of schools will then appear at the lower section of the screen. Put a check mark in schools which are open for that school year then click on the <Submit> button found at the lower part of the page (not shown). Schools which have not been checked are treated as closed. Clicking on the <Select All> checkbox will check or uncheck all the schools. You may then remove the check mark for schools which are closed for that particular school year.
3.5. Entering Integrated Schools
3.5.1. The <Integrated School> link allows you to identify the integrated schools in a particular division. Clicking on the link will bring you to the Select Division Screen. Simply select the appropriate division and click on the <Next> button.
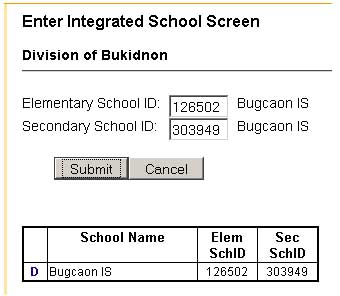
3.5.2. Clicking on the <Next> button will bring you to the Enter Integrated School Screen. Simply enter the school ID of the integrated school at the elementary and secondary levels. Once you submit the data, the table at the bottom of the screen will show the integrated schools for the division.
3.5.3. When a school stops offering both elementary and secondary levels, simply click on the <D> link to access the Delete Integrated School Screen.
3.6. Entering Form 3 Data
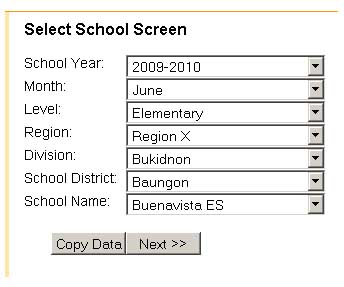
3.6.1. The <Form 3 > link allows you to enter data for the Monthly Report of Enrolment and Attendance of Pupils/Students (Form 3). Clicking on the link will bring you to the Select School Screen. Simply enter details for the month, level, school district and school then click on the <Next> button. If no school appears in the <School Name> dropdown it is because you have not opened any school for that school year. Refer to the previous section for instructions on how to open schools.
3.6.2. Clicking on the Next button will bring you to the Enter Form 3 Data Screen. Enter the data required and click on the <Add> button to save the data. The name of the section is required. If the school did not provide the name of the section, the Division can assign a number for the section. It is important that the name of the section be consistent across the different months.
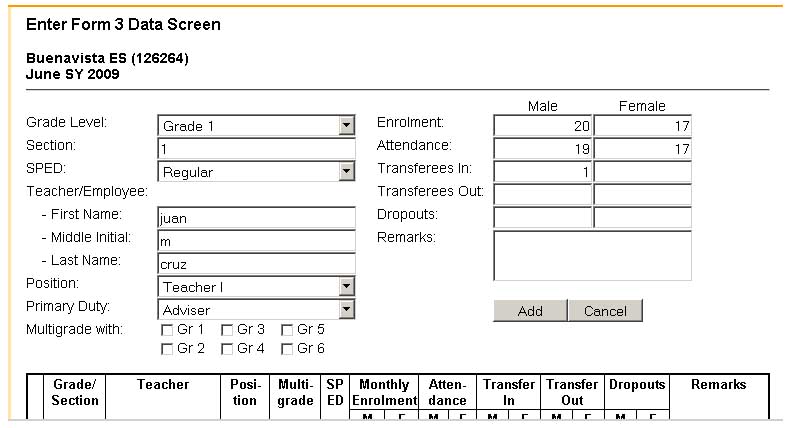
3.6.3. Clicking the <Add> button will update the database and display the data for that section in the table found at the buttom of the screen.
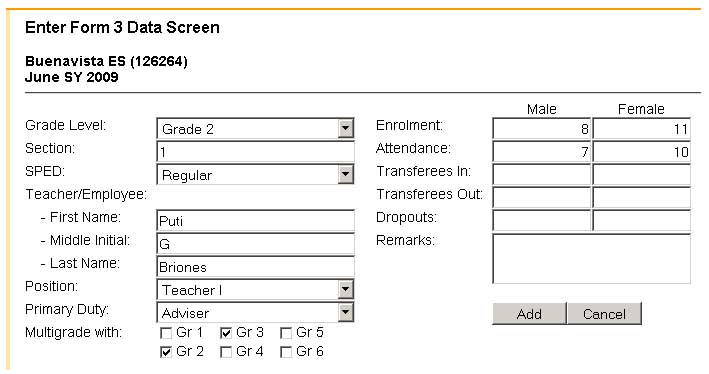
3.6.4. To specify that a particular class is multigrade, check the appropriate grade levels in the <Multigrade with> checkboxes. In the example below, data is being entered for the Grade 2 class of Puti Briones who is teaching a multigrade class for Grades 2 and 3. You will note that both Grades 2 and 3 have been checked in the <Multigrade with> checkboxes. When you encode the Grade 3 data taught by Puti Briones, you must also check Grades 2 and 3 in the <Multigrade with> checkboxes to indicate that this class is combined with the previously entered Grade 2 class.
The screenshot below shows the data entered for Grades 1, 2 and 3. Note that the column on multigrade for Grade 1-1 is blank indicating that it is a monograde class. For Grades 2-1 and 3-1, the multigrade column is G23. This means that the two classes form a multigrade class that is composed of Grades 1 and 2 taught by Puti Briones. It is very important the the name of the teacher be exactly the same for both grade levels. If there is a slight difference in the spelling then the system will treat the entries as different teachers.

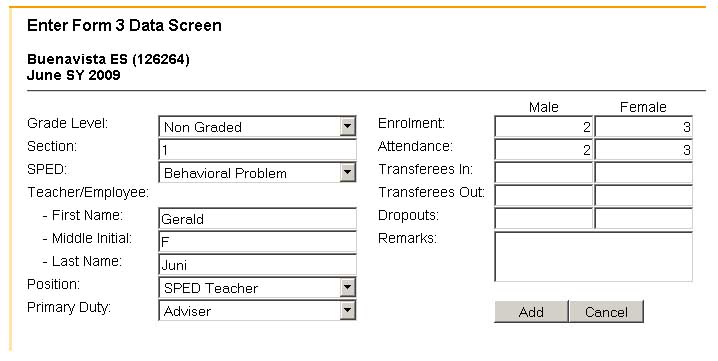
3.6.5. To encode a SPED class, select the learning disability in the <SPED> dropdown. If the SPED class is nongraded select the nongraded option in the <Grade Level> dropdown. The screen shot below shows the options selected to enter a nongraded class of pupils with Behavioral Problem taught by Gerald Juni.
3.6.6. It is possible for a graded SPED class to be multigrade. Entering data for this type of class simply involves specifying the learning disability in the <SPED> dropdown and checking the appropriate grade levels in the <Multigrade with> checkboxes.
3.6.7. To encode a class which is handled by a substitute teacher, enter the name of the original teacher in the textboxes for First Name, Middle Initial, and Last Name. Then enter the name of the substitute in the <Remarks> textbox with a note that he/she is a substitute.
3.6.8. To encode a class which is handled by a locally paid teacher, enter all the information required but leave the <Position> dropdown blank and enter the source of funding in the <Remarks> textbox.
3.6.9. To encode a class which is assigned to an item that is now vacant, enter a number in the <Last Name> textbox and “Vacant” in the <First Name> textbox. If there are more than one vacant items, the first name should be different for each item to be counted correctly in the reports
3.6.10. To encode a Subject Teacher, School Head or Support Personnel select the appropriate option in the <Primary Duty> dropdown.
3.6.11. To encode morning and afternoon preschool classes taught by the same teacher, treat the two classes as different sections.
3.6.12. The screen shot below shows sample data for the scenarios cited in the previous sections.
3.6.13. An elementary teacher teaching at the secondary level of an Integrated School should be recorded at the elementary level with <Primary Duty> set to “Others” and <Remarks> stating that the said teacher is teaching at the secondary level. The same teacher will be recorded in the secondary level with <Position> set to “blank”, <Primary Duty> set accordingly and <Remarks> stating that the said teacher is borrowed from the elementary level.
3.6.14. To review the data encoded, generate the <Monthly Report on Enrolment and At-tendance>, <Monthly Report of Personnel> and <Monthly List of Personnel> dis-cussed in Sections 4 and 5.
3.6.15. If there is a need to add options in the <Position> and <Primary Duty> dropdowns, send an email to the Administrator so the system can be updated.
3.6.16. To edit the data for a particular record, simply click the <E> link beside the Grade/Section column. This will bring you to the Enter Form 3 Data Screen where you can revise the data for that Grade Level and Section. Click on the <Edit> button to save the revisions.
3.6.17. To delete a record simply click on the <D> link beside the Grade/Section column. This will bring you to the Delete Form 3 Data Screen. Click on the <Delete> button to remove the record from the database.
3.6.18. In the Select School Screen you will note that there is a <Copy Data> button found after the School Name. This button allows the user to copy data from the latest month with encoded data to the month chosen in the Select School Screen. In this case, we have already encoded data for June 2009 so clicking on the <Copy Data> button will copy the data encoded for June 2009 into July 2009. This averts the need to retype the name of the teacher every month. However, you have to edit each of the records and enter the enrolment, attendance, transferee and dropout data for July 2009.
3.7. Entering School Head Data
3.7.1. The <School Head> link allows you to enter data for the school head of a school in a particular school year. Clicking on the link will bring you to the Select School Screen. Simply enter details for the level, school district and school then click on the <Next> button.
3.7.2. Clicking on the Next button will bring you to the Enter School Head Data Screen. Enter the data required and click on the <Submit> button to save the data. Editing of school head data follows the same procedure as adding data.
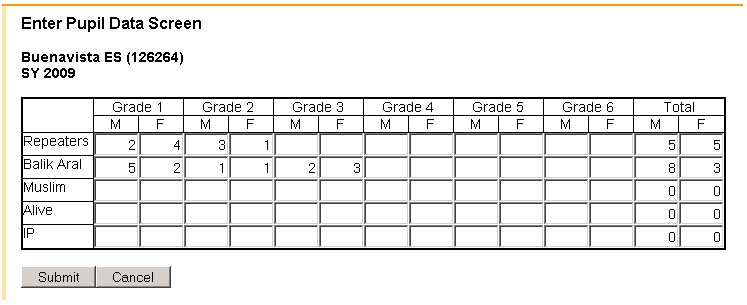
3.8. Entering Pupil Data
3.8.1. The <Pupil Data> link allows you to enter Pupil data of a school based on the BEIS forms for a particular school year. This includes Repeaters, Balik Aral, Muslim Enrolment, Alive Enrolment and IP Enrolment. Clicking on the link will bring you to the Select School Screen which can be used to access the Enter Pupil Data Screen. Simply enter the required data and click the <Submit> button to update the database. Editing of pupil data follows the same procedure as adding data.
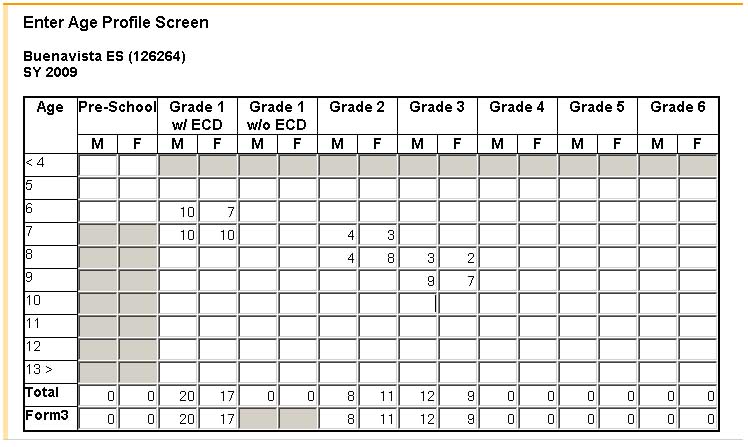
3.9. Entering Age Profile Data
3.9.1. The <Age Profile> link allows you to enter the Age Profile data of a school based on the BEIS forms for a particular school year. Clicking on the link will bring you to the Select School Screen which can be used to access the Enter Age Profile Screen. Simply enter the required data and click the <Submit> button to update the database. The age profile data must tally with the Form 3 enrolment in the official cut-off month for the BEIS (usually August 31) before it can be saved. Editing of Age Profile data follows the same procedure as adding data.
3.10. Entering Shifting Data
3.10.1. The <Shifting> link allows you to enter Shifting data of a school based on the BEIS forms for a particular school year. Clicking on the link will bring you to the Select School Screen which can be used to access the Enter Shift Screen. Simply enter the required data and click the <Submit> button to update the database. Shifting data must tally with the Form 3 data in the official cut-off month for the BEIS (usually August 31) before it can be saved. Editing of Shifting data follows the same procedure as adding data.
3.11. Entering Promotee Data
3.11.1. The <Promotees> link allows you to enter the Promotees of a school based on the BEIS forms for a particular school year. Clicking on the link will bring you to the Select School Screen which can be used to access the Enter Promotees Screen. Simply enter the required data and click the <Submit> button to update the database. Editing of Promotee data follows the same procedure as adding data.
3.12. Entering Dropout Data
3.12.1. The <Dropouts> link allows you to enter the Dropouts of a school based on the BEIS forms for a particular school year. Clicking on the link will bring you to the Select School Screen which can be used to access the Enter Dropouts Screen. Simply enter the required data and click the <Submit> button to update the database. Editing of Dropout data follows the same procedure as adding data.
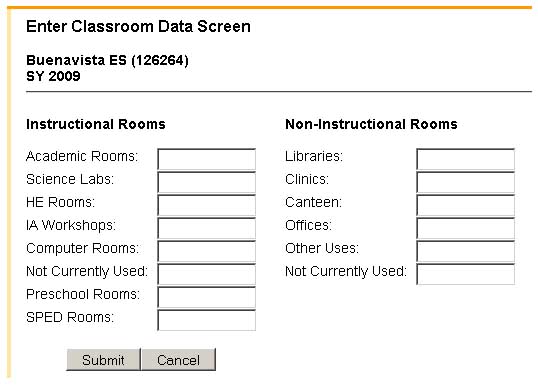
3.13. Entering Classroom Data
3.13.1. The <Rooms> link allows you to enter classroom data of a school based on the BEIS forms for a particular school year. Clicking on the link will bring you to the Select School Screen which can be used to access the Enter Classroom Data Screen. Simply enter the required data and click the <Submit> button to update the database. Editing of Classroom data follows the same procedure as adding data.
3.14. Entering Utilities Data
3.14.1. The <Utilities> link allows you to enter Water and Electrical facilities of a school based on the BEIS forms for a particular school year. Clicking on the link will bring you to the Select School Screen which can be used to access the Enter Water and Electricity Screen. Simply enter the check the available water and electrical facilities and click the <Submit> button to update the database. Editing of Utilities data follows the same procedure as adding data.
3.15. Entering Furniture Data
3.15.1. The <Furniture> link allows you to enter Furniture data of a school based on the BEIS forms for a particular school year. Clicking on the link will bring you to the Select School Screen which can be used to access the Enter Furniture Data Screen. Simply enter the required data and click the <Submit> button to update the database. Editing of Furniture data follows the same procedure as adding data.
3.16. Entering Toilet Data
3.16.1. The <Toilets> link allows you to enter Toilet data of a school based on the BEIS forms for a particular school year. Clicking on the link will bring you to the Select School Screen which can be used to access the Enter Toilet Data Screen. Simply enter the required data and click the <Submit> button to update the database. Editing of Toilet data follows the same procedure as adding data.
3.17. Entering Locally Funded Teacher Data
3.17.1. The <Local Teachers> link allows you to enter the Locally Funded Teachers of a school based on the BEIS forms for a particular school year. Clicking on the link will bring you to the Select School Screen which can be used to access the Enter Locally-Funded Teachers Screen. Simply enter the required data and click the <Submit> button to update the database. Editing of Locally Funded Teacher data follows the same procedure as adding data.
3.18. Entering Non-teaching Personnel Data
3.18.1. The <Non-teaching Personnel> link allows you to enter Plantilla Items for the Non-teaching Personnel of a school based on the BEIS forms for a particular school year. Clicking on the link will bring you to the Select School Screen which can be used to access the Enter Non-Teaching Personnel Screen. Simply enter the required data and click the <Submit> button to update the database. Editing of Non-teaching Personnel data follows the same procedure as adding data.
3.19. Entering Teaching Personnel Data
3.19.1. The <Teaching Personnel> link allows you to enter Plantilla Items for the Teaching Personnel of a school based on the BEIS forms for a particular school year. Clicking on the link will bring you to the Select School Screen which can be used to access the Enter Teaching Personnel Screen. Simply enter the required data and click the <Submit> button to update the database. Editing of Teaching Personnel data follows the same procedure as adding data.
3.20. Entering Teacher Assignment Data
3.20.1. The <Teacher Assignment> link allows you to enter Teacher Assignment data of a school based on the BEIS forms for a particular school year. Clicking on the link will bring you to the Select School Screen which can be used to access the Enter Teacher Assignment Screen. Simply enter the required data and click the <Submit> button to update the database. The Teacher Assignment data should tally with the number of teachers working in the school as entered through the <Teaching Personnel> link described in the previous section. Editing of Teacher Assignment data follows the same procedure as adding data.
3.21. Entering Enrolment by Program
3.21.1. The <Enrolment by Program> link allows you to enter enrolment by program data of a school based on the BEIS forms for a particular school year. Clicking on the link will bring you to the Select School Screen which can be used to access the Enter Enrolment by Program Screen. Simply enter the required data and click the <Submit> button to update the database. Editing of enrolment by program data follows the same procedure as adding data.
3.22. Entering Teaching Load and Specialization Data
3.22.1. The <Load/Specialization> link allows you to enter Teaching Load and Specialization data of a school based on the survey forms for a particular school year. Clicking on the link will bring you to the Select School Screen which can be used to access the Enter Teaching Load/Specialization Screen. Enter the teaching load of the teacher and check the subject areas where the teacher has a major then click on the <Add> button to save the data.
3.22.2. Clicking the <Add> button will update the database and display the data for that section in the table found at the buttom of the screen.
3.22.3. To edit the data for a particular record, simply click the <E> link beside the Teacher column. This will bring you to the Enter Teaching Load/Specialization Screen where you can revise the data for that Teacher. Click on the <Edit> button to save the revisions.
3.22.4. To delete a record simply click on the <D> link beside the Teacher column. This will bring you to the Delete Form 3 Data Screen. Click on the <Delete> button to remove the record from the database.
3.23. Entering ICT Facilities Data
3.23.1. The <ICT Facilities> link allows you to enter ICT data of a school based on the survey forms for a particular school year. Clicking on the link will bring you to the Select School Screen which can be used to access the screens for entering ICT Data.
3.23.2. The <ICT Coordinator> link will bring you to the Enter ICT Coordinator Screen. Simply enter the required data and click the <Submit> button to update the database. Editing the ICT Coordinator data follows the same procedure as adding data.
3.23.3. The <Computer Facilities> link will bring you to the Enter Computer Facilities Screen. Simply enter the required data and click the <Submit> button to update the database. Click on the <E> link beside the Source column to edit the data and the <D> link to delete the data.
3.23.4. The <Internet Connection> link will bring you to the Enter Internet Connection Screen. Simply enter the required data and click the <Submit> button to update the database. Editing the Internet Connection data follows the same procedure as adding data.
3.24. Finalize Data
3.24.1. The <Finalize Data> link allows you to finalize data for a particular month. This locks the data from further editing and allows the general public (users without accounts) to generate reports for that month. It is advisable to lock data only after all schools have been encoded.
3.24.2. Clicking on the <Finalize Data> link will bring you to the Finalize Data Screen. Simply select the School Year, Month, Region and Division then check the type of data which you want to lock. Clicking on the <Submit> button locks the data checked for that month. To unlock data for a particular month, simply remove the check mark and submit the request.
4. GENERATING REPORTS
4.1. Accessing the Statistical Report Screen
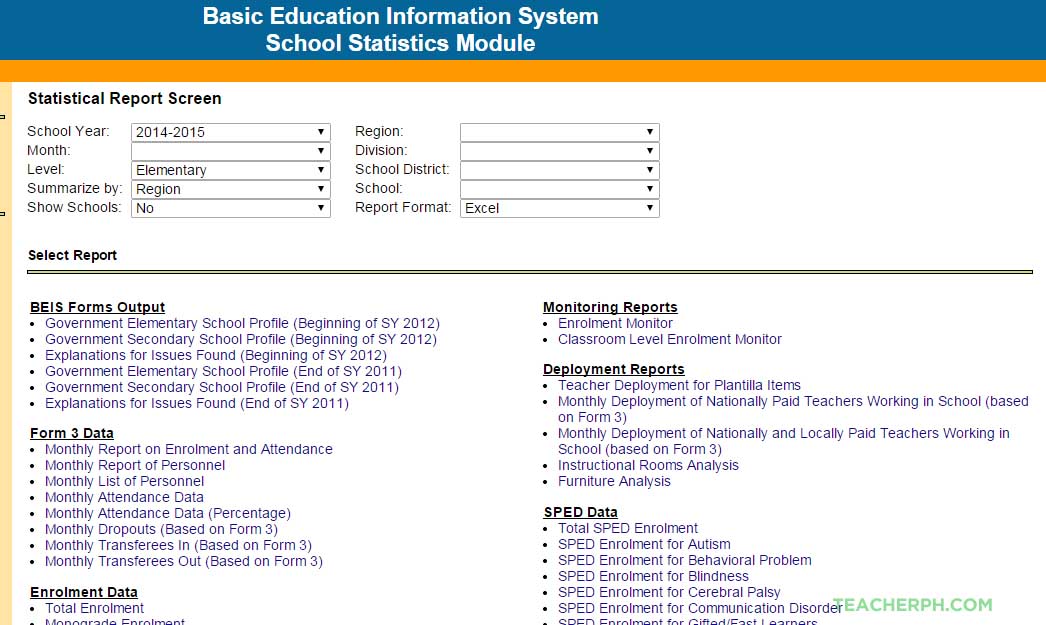
4.1.1. The <Reports> link allows you to generate reports available in the BEIS-SSM. Clicking on the link will bring you to the Statistical Report Screen. The dropdown buttons allow you to select which School Year, Month, and Level will be processed for the report. They also allow you summarize the data by Region, Division, School District, Province, Municipality or School. The reports can be generated by clicking on the links below the Select Report section.
4.2. Generating Regional Reports
4.2.1. Regional Reports can be generated by setting the <Summarize by> dropdown to “Region” and the <Show Schools> dropdown to “No”. The settings below will generate a Regional report for the whole country illustrated in the screen shot at the right. If a Region is selected then the report will show data only for that Region.
4.3. Generating Division Reports
4.3.1. Division Reports can be generated by setting the <Summarize by> dropdown to “Division” and the <Show Schools> dropdown to “No”. The settings below will generate a Division report for Region X illustrated in the screen shot at the right. If a Division is selected then the report will show data only for that Division. If both the Region and Division are set to “blank” then the system will generate a report for all divisions in the country.
4.4. Generating School District Reports
4.4.1. School District Reports can be generated by setting the <Summarize by> dropdown to “School District” and the <Show Schools> dropdown to “No”. The settings below will generate a School District report for Oroquieta City illustrated in the screen shot at the right. If a School District is selected then the report will show data only for that School District. If the Region, Division and School District dropdowns are set to “blank” then the system will generate a report for all school districts in the country.
4.5. Generating Legislative District Reports
4.5.1. Legislative District Reports can be generated by setting the <Summarize by> dropdown to “Legislative District” and the <Show Schools> dropdown to “No”. The settings below will generate a Legislative District report for Oroquieta City illustrated in the screen shot at the right. If a Legislative District is selected then the report will show data only for that Legislative District. If the Region, Division and Legislative District dropdowns are set to “blank” then the system will generate a report for all Legislative Districts in the country.
4.6. Generating Province Reports
4.6.1. Province Reports can be generated by setting the <Summarize by> dropdown to “Province” and the <Show Schools> dropdown to “No”. The settings below will generate a Province report for Region X illustrated in the screen shot at the right. If a Province is selected then the report will show data only for that Province. If the Region and Province dropdowns are set to “blank” then the system will generate a report for all Provinces in the country.
4.7. Generating Municipal Reports
4.7.1. Municipal Reports can be generated by setting the <Summarize by> dropdown to “Municipality” and the <Show Schools> dropdown to “No”. The settings below will generate a Municipal report for Region X illustrated in the screen shot at the right. If a Municipal is selected then the report will show data only for that Municipal. If the Region and Municipal dropdowns are set to “blank” then the system will generate a report for all Municipals in the country.
4.8. Generating School Reports
4.8.1. School Reports can be generated by setting the <Show Schools> dropdown to “Yes (Separate Annexes)” or to “Yes (Combine Annexes)”. The Separate Annexes option will display all the schools regardless of whether they are mother or annex schools. The Combine Annex option will only display the mother schools and automatically combine the data of their respective annexes. The <Summarize by> dropdown is used to limit the report to a particular area (eg. Region, Division or School District). The settings below will generate a School report for Oroquieta City District I illustrated in the screen shot at the right. If a School is selected then the report will show data only for that School. If the Division and School District dropdowns are set to “blank” then the system will generate a report for all Schools in the Region.

5. TYPES OF REPORTS
5.1. Form 3 Data
5.1.1. Monthly Report on Enrolment and Attendance. Generates what is commonly called the Form 3 which contains enrolment data, attendance, transferees in, transferees out and dropouts for each section in a school. The report also shows a list of all the personnel working in the school and the teacher handling the section. It can only be generated by school.
5.1.2. Monthly Report of Personnel. Generates a summary of personnel actually working in a particular area by position title. The report is categorized into teachers, school administrators, district supervisors, administrative/ support staff and locally funded personnel. The report can be used to summarized the number of personnel in any of the administrative levels of the Department (Region, Division, School District, School, Congressional District, Province, or Municipality).
5.1.3. Monthly List of Personnel. Generates a list of all personnel actually working in a particular area. It also displays the position held by the employee as well as his/her primary duty.
5.1.4. Monthly Attendance Data. Generates the monthly attendance pupils/students in a particular area based on data from the Form 3.
5.2. Enrolment Data
5.2.1. Total Enrolment. Generates total enrolment by gender and grade/year level for a particular month.
5.2.2. Monograde Enrolment. Generates monograde enrolment by gender and grade level for a particular month.
5.2.3. Multigrade Enrolment. Generates multigrade enrolment by gender and grade level for a particular month.
5.2.4. Number of Classes. Generates number of monograde classes by grade/year level and multigrade classes for a particular month.
5.2.5. Shifting Data. Generates enrolment and number of classes by shift for a particular school year.
5.2.6. Muslim Enrolment. Generates muslim enrolment by gender and grade/year level for a particular school year.
5.2.7. Alive Enrolment. Generates enrolment in Alive classes by gender and grade/year level for a particular school year.
5.2.8. Indigenous Enrolment. Generates enrolment of indigenous peoples by gender and grade/year level for a particular school year.
5.2.9. Enrolment by Program Type. Generates enrolment in secondary schools by type of program offered, gender and year level for a particular school year.
5.2.10. Enrolment in Integrated Schools. Generates enrolment in integrated schools by gender and grade/year level for a particular school year.
5.2.11. Age Profile of Pupils/Students. Generates enrolment by gender and age group of pupils/students for a particular school year.
5.2.12. Pre-School Data. Generates preschool enrolment by gender, preschool classes and number of schools offering preschool for a particular month.
5.2.13. Age Profile of Preschool Pupils. Generates preschool enrolment by gender and age group of pupils for a particular school year.
5.3. Pupil Data
5.3.1. Number of Promotees. Generates promotees by gender and grade/year level for a particular school year.
5.3.2. Number of Repeaters. Generates repeaters by gender and grade/year level for a particular school year.
5.3.3. Number of Dropouts. Generates dropouts by gender and grade/year level for a particular school year.
5.3.4. Number of Balik Aral. Generates balik aral by gender and grade/year level for a particular school year.
5.4. Personnel Data
5.4.1. Nonteaching Plantilla Items. Generates number of plantilla items for non-teaching professional personnel and non-teaching non-professional personnel for a particu-lar school year.
5.4.2. Teaching Plantilla Items. Generates number of plantilla items for teaching profes-sional personnel for a particular school year.
5.4.3. Nonteaching Personnel Actually Working in the School. Generates number of non-teaching professional personnel and non-teaching non-professional personnel actually working in the school for a particular school year. Teacherph.com
5.4.4. Teaching Personnel Actually Working in the School. Generates number of teaching professional personnel actually working in the school for a particular school year.
5.4.5. Vacant Nonteaching Items in the School. Generates number of vacant plantilla items for non-teaching professional personnel and non-teaching non-professional personnel for a particular school year.
5.4.6. Vacant Teaching Items in the School. Generates number of vacant plantilla items for teaching professional personnel for a particular school year.
5.4.7. Locally Funded Teachers. Generates number of locally funded teachers by funding source for a particular school year.
5.4.8. Teacher Assignment. Generates number of teachers by teaching load for a particular school year.
5.4.9. Teachers Teaching Subjects without Specialization. Generates the number of teachers with teaching load in subject areas where they do not have any specializationn/major for a particular school year. The example below shows that there are 1 English, 2 Filipino, and 1 General Science teachers who are non-majors in those subject areas in the Division of Oroquieta City (fictitious data). This indicates how many teachers will need training in a particular subject area.
5.4.10. Teaching Load and Specialization of Teachers. Generates a list of teachers with their respective teaching loads and specialization/major for a particular school year. The example below shows that the following teachers are teaching subject areas where they do not have any specialization: B. Fusch (1 load Filipino), W. Ramoso (3 loads English and 4 Math), and M. Vellarde (2 loads General Science). This means that the said teachers will need additional training in the subject areas that they are handling without any specialization.
5.5. Facilities Data
5.5.1. Instructional Rooms. Generates number of rooms used as academic classrooms, science laboratories, home economics, industrial arts, computer, preschool and SPED rooms for a particular school year.
5.5.2. Non-Instructional Rooms. Generates number of rooms used as libraries, clinics, canteen, offices, and other uses for a particular school year.
5.5.3. Pupil Seating. Generates number of desks, sets of tables and chairs, and armchairs for a particular school year.
5.5.4. Toilets. Generates number of bowls, urinals and the pupil/student bowl ratio for a particular school year.
5.5.5. Water Facilities. Generates number and percentage of schools without water facilities as well as the available sources of water for a particular school year.
5.5.6. Electric Facilities. Generates number and percentage of schools without electric facilities as well as the available sources of electricity for a particular school year.
5.5.7. ICT Facilities. Generates number of computers for academic use, administrative use, and for repair as well as pupil to computer ratio, schools without LAN, schools without internet and schools without an internet service provider in the area.
5.6. Monitoring Reports
5.6.1. Enrolment Monitor. Generates a report that monitors the decrease of enrolment from one month to a later month taking into account transferees reflected in the Form 3 (Base Enrolment + Transferees In – Later Enrolment – Transferees Out). The report identifies areas where a large number of pupils/students are at risk of dropping out even before the school year ends. This allows focused interventions to be put in place to prevent these pupils/students from dropping out. The report adopts a color coding scheme that facilitates analysis of the data. Teacherph.com
5.6.2. Classroom Level Enrolment Monitor. Same as the enrolment monitor except that enrolment decrease can be monitored at the level of the teacher or section in a school. This allows interventions to be more focused to the pupils/students who need them.
5.7. Deployment Reports
5.7.1. Teacher Deployment of Plantilla Items. Generates a report that displays the total enrolment, teacher plantilla items assigned to an area, and the pupil/student to teacher plantilla ratio. The report identifies areas with excess teachers and areas with shortages. It adopts a color coding scheme that facilitates analysis of the data.
• Blue Less than 25 (Excessive surplus teacher provision)
• Sky Blue 25.00 – 29.99 (Surplus teacher provision)
• Green 30.00 – 34.99 (Generous teacher provision)
• Yellow 35.00 – 39.99 (National mean ratio)
• Gold 40.00 – 44.99 (Manageable ratio)
• Orange 45.00 – 49.99 (Moderate teacher shortage)
• Red More than 50.00 (Severe teacher shortage)
• Black No teacher (No nationally funded teachers)
5.7.2. Monthly Deployment of Nationally Paid Teachers Working in School (based on Form 3). Same as the Teacher Deployment of Plantilla items except that it generates nationally paid teachers that are actually working in the school. It automatically excludes teachers handling preschool classes, SPED and ALS from the analysis.
5.7.3. Monthly Deployment of Nationally and Locally Paid Teachers Working in School (based on Form 3). Same as the Teacher Deployment of Plantilla items except that it generates nationally and locally paid teachers that are actually working in the school. It automatically excludes teachers handling preschool classes, SPED and ALS from the analysis.
5.7.4. Instructional Rooms Analysis. Generates a report that displays the total enrolment, total instructional rooms, and the pupil/student to room ratio. The report identifies areas with excess rooms and areas with shortages. It adopts a color coding scheme that facilitates analysis of the data.
• Blue Less than 46 (Meets RA 7880 with one shift)
• Yellow 46.00 – 50.99 (Fails to meet RA 7880 with one shift)
• Gold 51.00 – 55.99 (Does not meet RA 7880 with double shift)
• Red More than 56.00 (Severe classroom shortage)
• Black No classroom (No existing instructional rooms)
5.7.5. Furniture Analysis. Generates a report that displays the total enrolment, total seats, and the pupil/student to seats ratio. The report identifies areas with excess seats and areas with shortages. It adopts a color coding scheme that facilitates analysis of the data.
• Blue Less than 0.49 (Two-seats per pupil even with one-shift)
• Sky Blue 0.50 – 0.69 (Surplus seat provision)
• Green 0.70 – 0.89 (Generous seat provision)
• Yellow 0.90 – 1.00 (Adequate in one-shift)
• Gold 1.01 – 1.99 (Adequate in two-shift schools)
• Orange 2.00 – 2.99 (More than 2 pupils per seat;
Inadequate in two-shift schools)
• Red More than 3.00 (More than 3 pupils per seat;
Severe shortage in two-shift schools)
• Black No seats (No existing seats)
5.8. SPED Data
5.8.1. Total SPED Enrolment. Generates a report that displays the total SPED enrolment by grade/year level for a particular month.
5.8.2. SPED Enrolment for Autism. Generates a report that displays the SPED enrolment for autism by grade/year level for a particular month.
5.8.3. SPED Enrolment for Behavioral Problem. Generates a report that displays the SPED enrolment for behavioral problem by grade/year level for a particular month.
5.8.4. SPED Enrolment for Blindness. Generates a report that displays the SPED enrolment for blindness by grade/year level for a particular month.
5.8.5. SPED Enrolment for Cerebral Palsy. Generates a report that displays the SPED enrolment for cerebral palsy by grade/year level for a particular month.
5.8.6. SPED Enrolment for Communication Disorder. Generates a report that displays the SPED enrolment for communication disorder by grade/year level for a particular month.
5.8.7. SPED Enrolment for Gifted/Fast Learners. Generates a report that displays the SPED enrolment for gifted/fast learners by grade/year level for a particular month.
5.8.8. SPED Enrolment for Hearing Impaired. Generates a report that displays the SPED enrolment for hearing impaired by grade/year level for a particular month.
5.8.9. SPED Enrolment for Intellectually Disabled/Mentally Challenged. Generates a re-port that displays the SPED enrolment for intellectually disabled/mentally chal-lenged by grade/year level for a particular month.
5.8.10. SPED Enrolment for Hearing Impaired. Generates a report that displays the SPED enrolment for hearing impaired by grade/year level for a particular month.
5.8.11. SPED Enrolment for Learning Disability. Generates a report that displays the SPED enrolment for learning disability by grade/year level for a particular month. Teacherph.com
5.8.12. SPED Enrolment for Multiple Handicap. Generates a report that displays the SPED enrolment for multiple handicap by grade/year level for a particular month.
5.8.13. SPED Enrolment for Orthopedically Handicapped. Generates a report that displays the SPED enrolment for orthopedically handicapped by grade/year level for a par-ticular month.
5.8.14. SPED Enrolment for Special Health Problems. Generates a report that displays the SPED enrolment for special health problems by grade/year level for a particular month.
5.9. Miscellaneous Data
5.9.1. Status Report. Generates a report that displays the status of encoding for a particular type of data.
5.9.2. List of Regions. Generates a report that displays a list of Regions.
5.9.3. List of School Divisions. Generates a report that displays a list of School Divisions.
5.9.4. List of School Districts. Generates a report that displays a list of School Districts.
5.9.5. List of Temporarily Closed Schools. Generates a report that displays a list of temporarily closed schools.
5.9.6. List of Mother Schools and Annexes. Generates a report that displays a list of schools and their respective annexes.
5.9.7. Masterlist of Open Schools. Generates a report that displays a list of open schools with address, name and designation of school head, contact numbers and email.
5.9.8. Number of Open Schools. Generates a report that displays the number of schools and typology of schools.
6. COMPLYING WITH BEIS DEADLINES
6.1. BEIS Quick Counts
6.1.1. To ensure that the October 31 deadline for Quick Counts is complied, prioritize the encoding of July Form 3, Rooms, Furniture, Teaching Personnel and Enrolment by Program.
6.2. BEIS Performance Indicators
6.2.1. To ensure that Performance Indicators are available by December for use in the Annual Report, prioritize the encoding of Pupil Data, Age Profile, Promotees and Dropouts after the data needed for Quick Counts have been encoded.
6.3. BEIS School Statistics
6.3.1. Other data can be encoded after entering data needed for computing the Quick Counts and Performance Indicators. The deadline for the rest of the school statistics is end of February.